Recently, I needed to integrate Pushover with my app so users could connect their individual Pushover accounts and get push messages from my web app on their Pushover app on the phone.
Yes, if you need your app to send push notifications to users, you could use this service and avoid developing your own mobile app just to do this.
I checked https://laravel-notification-channels.com/pushover but it didn’t work for my use case. So, I decided to create my own custom notification channel and this is how I did it.
Step1 : Create your Pushover account and follow the steps
Go to https://pushover.net and create your account, You get a free 30 day trial, although their app is super cheap at costs only $4.99 one-time payment.
Once you are logged in, you will get an option to create an app.

Name your app, you may choose an icon if you want the Pushover notification to show your app icon, but its optional.
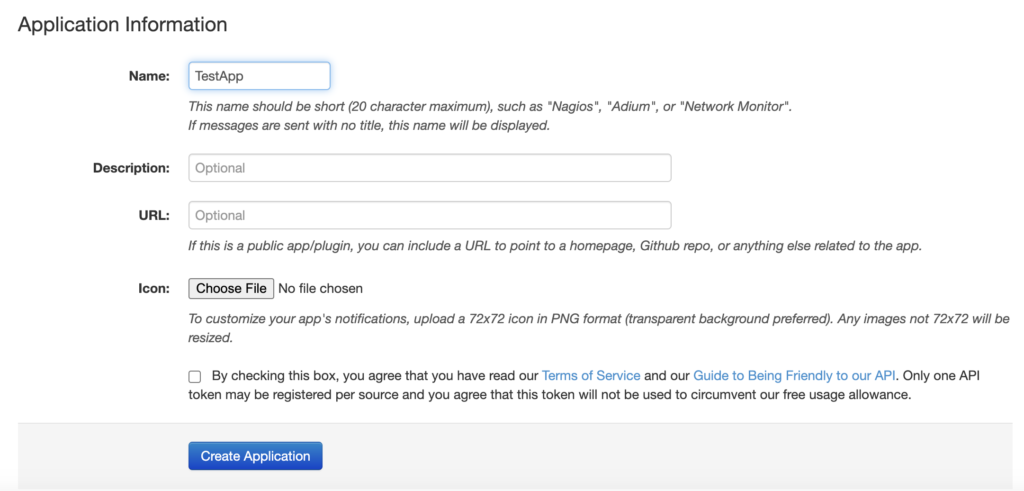
After creating the app you will be navigated to the below screen.
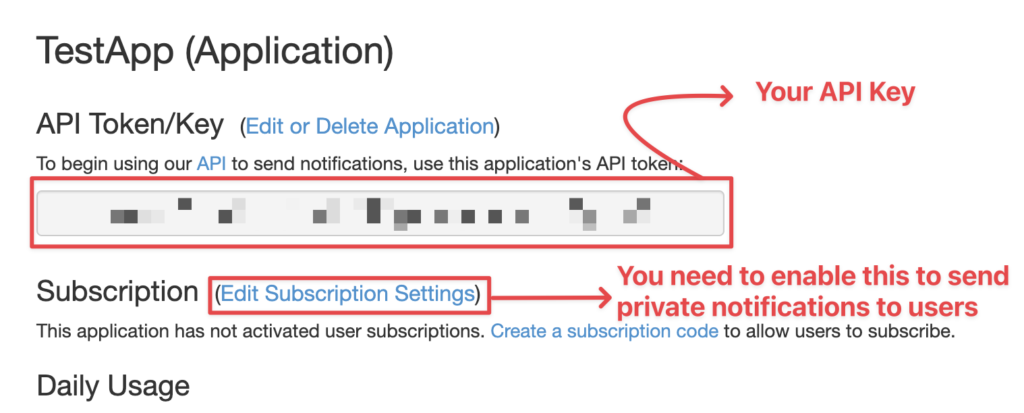
Copy the API key and save it in your .env file like so
PUSHOVER_API_KEY=***************In the Edit Subscription Settings screen,
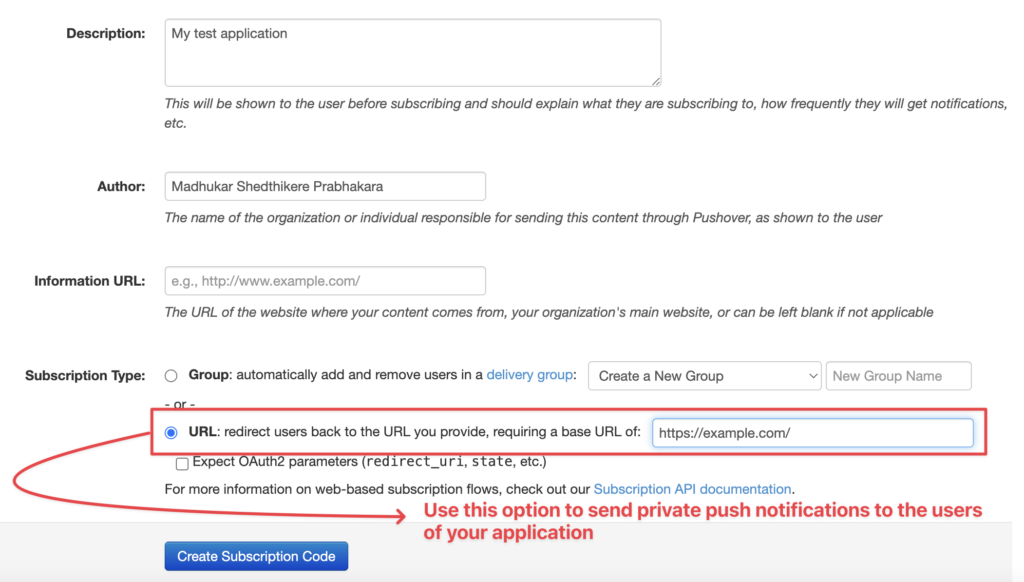
When you click on “Create Subscription Code”, you will see this…

This url will be used to allow the users of our application to authenticate with their Pushover account. More on that below.
Step 2: Folder structure to write code and initial setup
First things first, let us setup the folder structure and organize our authentication keys so we have everything organized.
I am using Laravel 11 for my project.
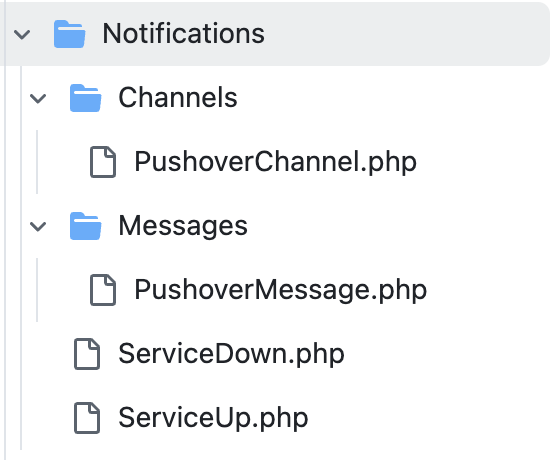
- I have created two folders in the Notifications directory. Channels and Messages.
- In the Config directory in services.php, I have setup Pushover service
- In the .env file I have all the variables setup which I use in the services.php file
Now that we know how to structure our code to build this feature, let us do this practically
Step 3: Channels and Messages Folder
I have created two folders in Notifications directory.
Channels folder, folder where I am going to create Pushover channel and all my future custom channels, where I have PushoverChannel.php.
Messages folder which will house PushoverMessage.php, Show below is the image of the structure.
In PushoverChannel.php we write code that actually is responsible for sending the push message to the users Pushover app on their devices. Obviously this message is routed through their Pushover account. The code contains comments that tells us what it does.
<?php
namespace App\Notifications\Channels;

use Illuminate\Notifications\Notification;
use Illuminate\Support\Facades\Http;

class PushoverChannel
{
    public function send($notifiable, Notification $notification)
    {
        // Get the Pushover message from the notification
        $message = $notification->toPushover($notifiable);

        // Send the notification via Pushover
        $response = Http::post('https://api.pushover.net/1/messages.json', [
            'token' => config('services.pushover.api_key'),  //Pushover API key set in the .env file
            'user' => $notifiable->routeNotificationForPushover(), //Pushover user token obtained when the user authorized our app to connect to the user's Pushover account
            'message' => $message->content, //Actual message that will be sent in the push notification
            'title' => $message->title, //Message title to be sent in the push notification
            'url' => $message->url, //Optional url that can be sent in the message
            'url_title' => $message->url_title, //Optional url title that can be sent in the message
            'priority' => $message->priority, //This decides how the message looks on the Pushover app on the users's phone
        ]);

        if ($response->failed()) {
            throw new \Exception('Failed to send Pushover notification: ' . $response->body());
        }
    }
}
The PushoverMessage.php has the code to accept the actual message and the look and feel of the message. This is dependent on what Pushover supports, documented here in their official guide.
<?php
namespace App\Notifications\Messages;

class PushoverMessage
{
    public $content;
    public $title;
    public $url;
    public $url_title;
    public $priority;

    public function __construct($content)
    {
        $this->content = $content;
    }

    public function title($title)
    {
        $this->title = $title;
        return $this;
    }

    public function url($url, $url_title = null)
    {
        $this->url = $url;
        $this->url_title = $url_title;
        return $this;
    }

    public function priority($priority)
    {
        $this->priority = $priority;
        return $this;
    }
}
Now that we have written the custom code to include the Pushover channel, let us look at how do we actually use it and send the push notifications
Step 4: Creating and sending Pushover notifications
Make a notification in your Laravel project, like so
php artisan make:notification ServiceDownYou may call it whatever you need. I have called it ServiceDown as I am building a website uptime monitoring tool.
Here is the complete code for ServiceDown.php
<?php

namespace App\Notifications;

use Illuminate\Bus\Queueable;
use Illuminate\Contracts\Queue\ShouldQueue;
use Illuminate\Notifications\Messages\MailMessage;
use Illuminate\Notifications\Notification;
use App\Notifications\Channels\PushoverChannel;
use App\Notifications\Messages\PushoverMessage;
use Illuminate\Notifications\Slack\SlackMessage;
use Illuminate\Notifications\Slack\BlockKit\Blocks\ContextBlock;
use Illuminate\Notifications\Slack\BlockKit\Blocks\SectionBlock;
use Illuminate\Notifications\Slack\BlockKit\Composites\ConfirmObject;
use App\Services\SlackService;
class ServiceDown extends Notification implements ShouldQueue
{
    use Queueable;

    /**
     * Create a new notification instance.
     */
    protected $url, $team_id;
    public function __construct($url, $team_id)
    {
        //
        $this->url=$url;
        $this->team_id=$team_id;
    }

    /**
     * Get the notification's delivery channels.
     *
     * @return array<int, string>
     */
    public function via(object $notifiable): array
    {
        return ['mail','slack', PushoverChannel::class]; //All the channels being used to notify the user
    }
    /**
     * Get the Pushover representation of the notification.
     */
    public function toPushover(object $notifiable): PushoverMessage
    {
        return (new PushoverMessage('Your website '.$this->url.' is down.')) //The actual message that will be sent
            ->title('Down')
            ->priority(1);
    }
    /**
     * Get the array representation of the notification.
     *
     * @return array<string, mixed>
     */
    public function toArray(object $notifiable): array
    {
        return [
            //
            'team_id'=>$this->team_id,
        ];
    }
}
In the User model, we have routeNotificationForPushover function that looks like so
public function routeNotificationForPushover()
{
     $pushoverService = new PushoverService(); //Have a service class defined for all Pushover related operations
     $pushover_connect=$pushoverService->getPushoverConnection($this->id); //This retrieves the pushover connection for the specific user
     $encryptedValue=$pushover_connect->makeVisible('pushover_code')->toArray(); //This makes the user token visible which is hidden by default for security purposes
     return Crypt::decryptString($encryptedValue['pushover_code']); //This decrypts the user token which is encrypted and stored in the db
}
In PushoverChannel.php, you would have observed the following code
'user' => $notifiable->routeNotificationForPushover()This calls the function in the User model and retrieves the user token before the message is pushed on the user device through Pushover.
But wait, where is the API key stored and how did the user token from Pushover account get stored in our DB?
That brings us to the last and final step, organizing the API tokens for our app and also fetching the user token from user’s Pushover account
Step 5: Getting User token and organizing the API key for our application
To manage API key for our application created on Pushover, we go to services.php in the Config directory
I have this service defined, like so:
'pushover' => [
        'api_key' => env('PUSHOVER_API_KEY'),
        'base_redirect_uri' => env('PUSHOVER_BASE_REDIRECT_URI'),
        'base_redirect_success' => env('PUSHOVER_REDIRECT_SUCCESS'),
        'base_redirect_failure' => env('PUSHOVER_REDIRECT_FAILURE'),
    ],
And in my PushoverChannel.php, I have this line of code which brings the API key from .env file
'token' => config('services.pushover.api_key'), //Pushover API key set in the .env fileIn my .env file I have these variables defined:
PUSHOVER_API_KEY=*******************
PUSHOVER_BASE_REDIRECT_URI=https://pushover.net/subscribe/************
PUSHOVER_REDIRECT_SUCCESS="https://example.com/auth/pushover/callback"
PUSHOVER_REDIRECT_FAILURE="https://example.com/integrations"
How do we get the user token? How is that saved in our DB?
This is where we need a feature to initiate a complete authorization flow that lets the user authorize our app to access the user’s Pushover account and retrieve the user token so we can send the user the push notifications.
On my app, this gets initiated from the Integrations screen
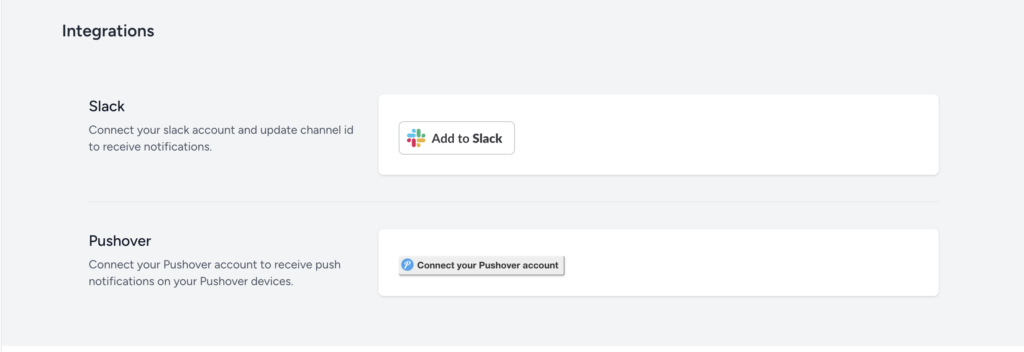
The Connect your Pushover account takes us to the following url (obtained when we first create the app on the Pushover website, Step 1)
https://pushover.net/subscribe/TestApp-816d9ywfogbqc16?success=https://example.com/auth/pushover/callback&failure=https://example.com/integrations
The success url is the callback to our application url which will be called upon successful authorization along with the user’s token, this is the token that needs to be encrypted and saved per user in the database. This is the same token that is returned from the User model’s routeNotificationForPushover method.
The code to handle the callback is below:
This code is part of the PushoverService.php which I have in my Services folder in my app.
public function connectPushover($team_id)
    {
        $redirect_success = urlencode(config('services.pushover.base_redirect_success'));
        $redirect_failure = urlencode(config('services.pushover.base_redirect_failure'));
        $rand = bin2hex(random_bytes(20));
        session(['pushover_rand' => $rand]);
        $base_uri = config('services.pushover.base_redirect_uri');
        $fullUrl = "{$base_uri}?rand={$rand}&success={$redirect_success}&failure={$redirect_failure}"; //This is the url the user is directed to when the user clicks on "Connect your Pushover account" in the Integrations screen

        return $fullUrl;
    }
    public function savePushoverToken($team_id, $pushover_user_key) //This is the function that handles the callback from the Pushover account
    {


        if ($pushover_user_key)
        {
            $pushover_connect= new PushoverConnect();
            $pushover_connect->team_id=$team_id;
            $pushover_connect->user_id=\Auth::id();
            $pushover_connect->pushover_code=Crypt::encryptString($pushover_user_key); //Encrypt the user token before saving
            $pushover_connect->save();
            return true;
        }
        else
        {
            $pushoverConnect=$this->getPushoverConnection(\Auth::id());
            $deleted=$pushoverConnect->delete();
            if ($deleted)
            {
                return true;
            }
        }
        throw new \Exception('No team found for this user. Please create a team first.' );
    }
The Controller that receives the callback request is shown below
public function redirect(PushoverService $pushoverService)
    {
        //
        $team_id=\Auth::user()->currentTeam->id;
        return \Redirect::to($pushoverService->connectPushover($team_id)); //Redirect to the Pushover account for authorization
    }
    public function handleCallback(Request $request, PushoverService $pushoverService) //Once authorized, handle the callback and get the user token
    {
        //
        try {
            $data=$request->all();
            $pushover_user_key=$data['pushover_user_key'];
            $saved=$pushoverService->savePushoverToken(\Auth::user()->currentTeam->id, $pushover_user_key);
            if ($saved)
            {
                return \Redirect::route('integrations.index');
            }
        }
        catch (\Exception $e)
        {
            return $e->getMessage();
        }
    }
This is my web.php routes file with appropriate route
Route::get('/auth/pushover/redirect', [App\Http\Controllers\PushoverConnectController::class, 'redirect'])->name('pushover.redirect');
Route::get('/auth/pushover/callback', [App\Http\Controllers\PushoverConnectController::class, 'handleCallback'])->name('pushover.callback');
Route::get('/auth/pushover/disconnect', [App\Http\Controllers\PushoverConnectController::class, 'disconnect'])->name('pushover.disconnect');
One final piece of information, what about the database table that stores this information? I am not using the user’s table to store this information, I am using a different table. Here is the migration for the table
Schema::create('pushover_connects', function (Blueprint $table) {
    $table->id();
    $table->foreignId('team_id')->constrained();
    $table->foreignId('user_id')->constrained();
    $table->text('pushover_code')->nullable();
    $table->timestamps();
});
The whole thing took me about a day to implement and push it into production.
Cheers!